Manage contact groups on your own account
Create a contact group
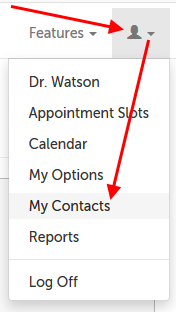
1. If you are creating a contact group for yourself, click on the profile icon in the upper right-hand corner, and select "My Contacts" from the drop-down menu.
2. Use the "Manage Contact Groups" button at the top or bottom of the page.

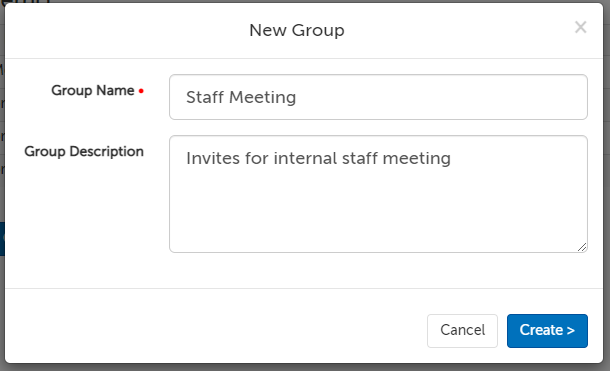
3. Use the "Create New Group" button at the bottom of the page.

4. Enter the name of the group. (This will appear in the dropdown when scheduling a session, so it should be recognizable and unique.) Optionally, you can add a description that will appear on the contact group page for future reference.
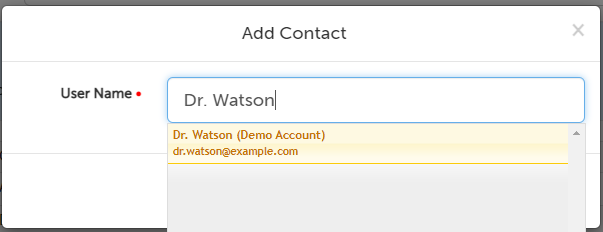
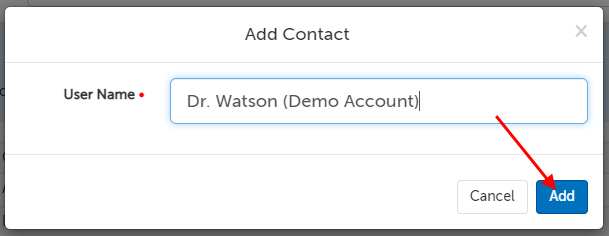
5. Once the group has been created, use the "Add Contact" button at the bottom of the next page.

6. Start typing the name of a contact or organization user to select that person from the autofill, and then click "Add".
- If the participant has an SMS number on their contact record (or, if an organization user, has a mobile number in their profile and settings to receive SMS invites), then text message invites will be preferentially used.
- If the participant does not have an SMS number on their contact record or user profile, then e-mail invites and reminders will be used.
- If there is no contact information for a contact, then they will not appear as an option to add to a contact group.
7. You will see the contact added to the group member list.
Edit the members of a contact group
1. If you are editing a contact group for yourself, click on the profile icon in the upper right-hand corner, and select "My Contacts" from the drop-down menu.
2. Use the "Manage Contact Groups" button at the top or bottom of the page.
3. Click the "Edit" button next to the name of the contact group you would like to edit.
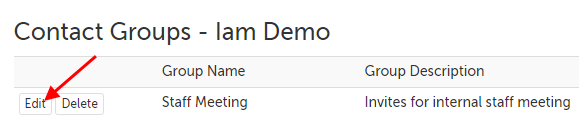
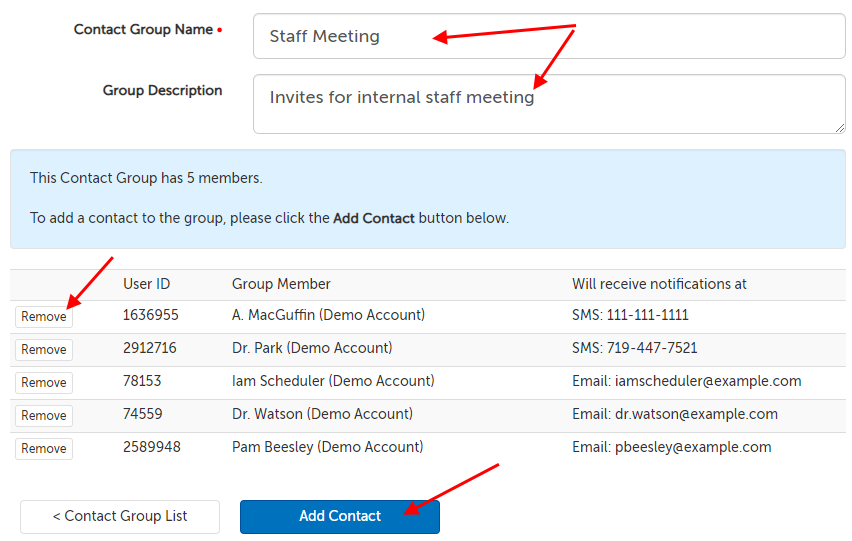
4. You can edit the name or description of the group by editing the text directly. (Changes will save automatically.)
You can also add additional members by clicking "Add Contact", or remove members by clicking the "Remove" button next to their name.
Delete a contact group
1. If you are deleting a contact group for yourself, click on the profile icon in the upper right-hand corner, and select "My Contacts" from the drop-down menu.
2. Use the "Manage Contact Groups" button at the top or bottom of the page.
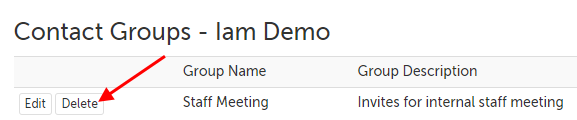
3. Click the "Delete" button next to the contact group you wish to delete.
Manage contact groups for a host in your organization
Create a contact group on behalf of a host
1. Click on the "Scheduling" tab at the top of the page.
- If your organization is using Virtual Clinic, you can select "Providers" from the drop down menu that appears.

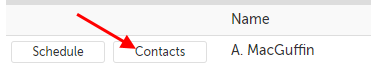
2. Click on the "Contacts" button next to the host you are creating the contact group for.
3. Use the "Manage Contact Groups" button at the top or bottom of the page.
4. Use the "Create New Group" button at the bottom of the page.
5. Enter the name of the group. (This will appear in the dropdown when scheduling a session, so it should be recognizable and unique.) Optionally, you can add a description that will appear on the contact group page for future reference.
6. Once the group has been created, use the "Add Contact" button at the bottom of the next page.
7. Start typing the name of a contact or organization user to select that person from the autofill, and then click "Add".
- If the participant has an SMS number on their contact record (or, if an organization user, has a mobile number in their profile and settings to receive SMS invites), then text message invites will be preferentially used.
- If the participant does not have an SMS number on their contact record or user profile, then e-mail invites and reminders will be used.
- If there is no contact information for a contact, then they will not appear as an option to add to a contact group.
8. You will see the contact added to the group member list.
Edit the members of a contact group on behalf of a host
1. Click on the "Scheduling" tab at the top of the page.
- If your organization is using Virtual Clinic, you can select "Providers" from the drop down menu that appears.
2. Click on the "Contacts" button next to the host you are creating the contact group for.
3. Use the "Manage Contact Groups" button at the top or bottom of the page.
4. Click the "Edit" button next to the name of the contact group you would like to edit.
5. You can edit the name or description of the group by editing the text directly. (Changes will save automatically.)
You can also add additional members by clicking "Add Contact", or remove members by clicking the "Remove" button next to their name.
Delete a contact group on behalf of a host
1. Click on the "Scheduling" tab at the top of the page.
- If your organization is using Virtual Clinic, you can select "Providers" from the drop down menu that appears.
2. Click on the "Contacts" button next to the host you are creating the contact group for.
3. Use the "Manage Contact Groups" button at the top or bottom of the page.
4. Click the "Delete" button next to the contact group you wish to delete.
This article was last reviewed by our Support team on January 6, 2023.